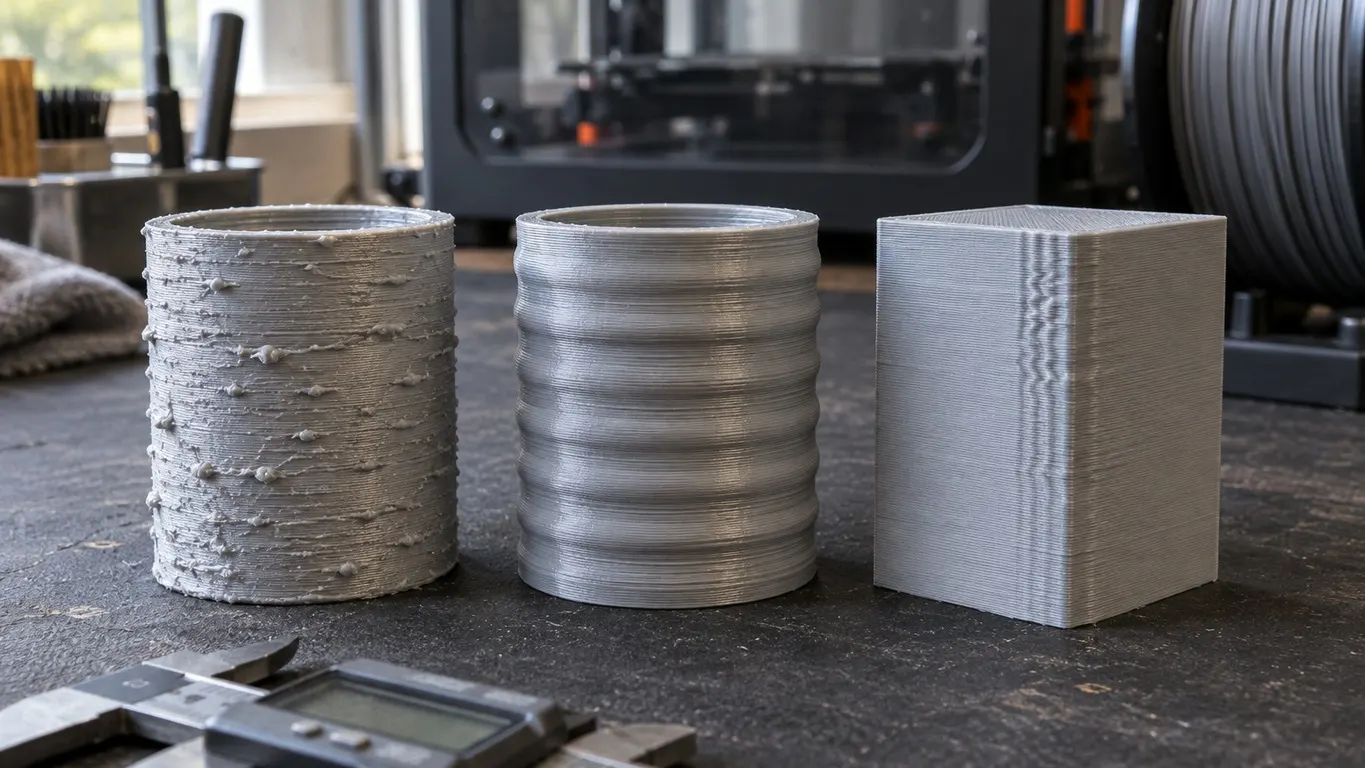
Z banding, ringing and a rough, choppy wall are three different marks, and the fix for each one lives somewhere else. Three Bambu Lab forum threads chased them: one ended at the hotend's heat path, one at a single slicer setting, one at a belt tensioning procedure nobody in the thread ever confirmed. None of the three closed cleanly. Before any of that, though, all three start at the same place: look at the part and work out which mark you actually have.
Reading the mark
| Defect | What it looks like | Where it shows | First place the forum looked |
|---|---|---|---|
| Rough, choppy surface | Vertical walls coarse and broken up, top surfaces bumpy; from the side the layers look swollen | Every upright face; a short test and a one-hour print came out fine, the next one did not | Part cooling fan, then the hotend's heat path |
| Z banding, or Z wobble | Evenly spaced horizontal bands, a rhythm that repeats up the part | Along Z, getting obvious above a certain height | A slicer setting; the hardware side stayed open |
| Ringing, or ghosting | Waves that echo away from a sharp corner and fade out | After corners, in the horizontal plane | Belt tension |
A regular geometric pattern on the top surface, the infill copied upward, is none of these three. That one has its own four settings and its own article: infill showing through. The roughness here is irregular, and it is on the vertical walls as well.
When the fan is the whole answer
The person who opened the January 2025 thread runs three P1S machines and an A1 mini, and one of them started misbehaving during the Christmas rush. That machine has 1,403 hours on it. They had done a full maintenance pass, tensioned the belts twice, and checked the PTFE tube for wear. The defect did not care about the material either, showing up on Amolen and Polymaker Silk PLA, on Bambu Basic PLA and on PETG. In their own words:
Anything upright is choppy and rough. Top surfaces are rough and bumpy.
Both early replies point at the same part, the part cooling fan, and the second one spells out the check: turn the part fan on from the app and watch whether the fan on the toolhead spins. It did not. What follows is the most useful thing in the thread, because the poster chased the fault rather than the part. The fan from the bad printer would not run on a good one; the fans from two good printers would not run on the bad one; and those same two fans worked on their own machines and on each other's. Both the fan and the side it plugs into were dead. The replying user guessed the extruder interface board and linked the P1 series spare part.
The part cooling fan and the hotend fan are two different fans: Bambu's hotend guide counts the hotend cooling fan as part of the hotend assembly and calls the one on the front cover the toolhead fan. The P1 periodic maintenance list does ask for a weekly dust check, but the two fans it names there are the auxiliary fan and the hotend fan; the toolhead part cooling fan has no replacement guide of its own and ships inside the front housing assembly. The thread's "toolhead fan" is the part cooling one, since the check described runs through the app. What cooling does over an overhang is cooling over overhangs; the question here is not the fan percentage but whether the thing spins at all.
Baked-on thermal paste, and what it did not fix
The fan eventually started working on its own. A short test print and a one-hour print came out fine, and the next one brought the defect back, with no print time given, which the poster describes as looking like a puffed pastry from the side. The accepted answer is a question, with a link to a community write-up on thermal grease:
Have you checked the thermal paste on your hot end? That or you have a partial nozzle clog.
It is worth not reading that as a maintenance instruction. The P1 series maintenance guide has a periodic list, with the carbon rods monthly, the Z lead screws every three months and the fans weekly, and thermal paste is not on it. Paste turns up only in the hotend replacement guides: once as the reassembly step telling you to apply new thermal paste, once as a note that hardened grease makes the ceramic heater and thermistor hard to remove until you soften it with alcohol. The forum suggestion is reasonable; it is not a documented service interval.
It also half worked. Taking the hotend apart, the poster found the ceramic piece stuck tight and the paste completely baked on, and with a new hotend and fresh paste the print improved a lot. In the same post they add that layer lines are still visible, the edges look jagged like teeth, and the layers are not even. The last word in the thread is that a full calibration might help, and two days later the thread closed itself. A P1P owner posting in the same thread never found a fix at all.
The A1 mini z wobble thread
In the April 2025 thread an A1 mini has been banding for a while, with 509 hours on the clock. Temperature and flow calibration, lower speeds, different filaments, lubrication and belt tensioning had all been tried already; if you want to do the temperature half properly, that is in the temperature tower article.
The settings quoted are worth a look: retraction 0.8 mm, retraction speed 30, Z hop 0.4 mm, Z hop type Auto. All four match the shared machine profile in the Bambu Studio repository exactly, so the printer was on stock retraction values.
Three other claims appear in the thread, and they do not carry equal weight. One user blames the extruder motor overheating: the first prints of the day are perfect, quality falls off the longer the machine runs, and the motor gets too hot to touch. Support could not resolve their case and the model support sent printed fine. Another blames a faulty microSD card, and a third answers that a class 10 card made no difference, so that one is refuted inside the thread. A fourth had the problem on a 0.2 mm nozzle and none printing the same model with a 0.4 mm.
The accepted answer lands in August 2025, posted by the person who opened the thread: change Z hop type from Auto to Normal. It had already been on the page for three months. Back in May 2025 another user wrote two tips two days apart, first to switch off Others → G-code output → Reduce infill retraction, then to move Z hop type from Auto to Normal, calling it a printer setting as they did so.
Where Z Hop Type actually lives
The objection arrives immediately after the accepted answer, and it is short: Z hop is a filament setting, and what the thread wanted was a printer setting. In the Bambu Studio source, both sides are partly right.
The key is z_hop_types, labeled Z Hop Type on screen, with Auto, Normal, Slope and Spiral as the options. The interface puts it in Printer settings → Extruder → Retraction, just under the Z hop height and its upper and lower boundaries, and just above the retraction speed. The filament tab carries a separate key of its own under Setting Overrides → Retraction, where checking the box next to it overrides the printer's value. The value the G-code generator reads is whatever those two resolve to, so the base setting is on the printer and the optional override is on the filament.
The difference between the two options is visible in the source as well. Auto decides per travel move: a spiral lift if the path crosses an overhang, a sloped lift if it does not. A sloped lift spreads the Z rise along the travel, so the nozzle does not climb immediately, while Normal goes straight up first and then moves across. Whether that difference is what caused the banding, nobody in the thread measured. Two users reported it helped, and that is the whole of the evidence.
Reduce infill retraction needs a version note. In 2025 it was a checkbox, and Bambu's shared process profile shipped with it on. Bambu Studio 2.6.0, released in April 2026, turned it into a three way dropdown of Disabled, Auto and Enabled, and the profiles now carry Auto, so on a current build you set the list to Disabled rather than clearing a box. What the setting is documented to do is skip retraction on travels that stay inside the infill, which is about oozing and print time. Its link to layer consistency is a forum report.
Ringing: the tensioner does the tensioning
In the November 2024 thread a P1S owner had fitted anti-vibration feet and run the built-in calibration, and the ringing was still there. They slice in Orca at 300 mm/s travel, 250 mm/s printing and 10,000 mm/s² acceleration.
The first reply points at belt tension and links Bambu's belt tension wiki page. The interesting question comes next: in the video the person only moves the toolhead around and retightens the screws, so does the belt not need tensioning by hand? No, says the accepted answer, and it explains why.
It has a spring loaded mechanism so it self tightens to the correct tension. When you loosen the screws the spring tensions it. You move the axis just to help it along.
The wiki backs that up, and the page covers the X1 and P1 series, so it applies to the P1S in the thread. The procedure runs:
- Power the printer off.
- Loosen the four tensioner screws without removing them.
- Move the toolhead gently back and forth several times.
- Park it at the rear and tighten the four screws again.
In the page's own words, the spring system in the belt-tensioner will tighten the belt to the correct tension. The same page warns separately against overtightening, which it says causes damage and does not give better results, suggests cleaning the carbon rods in the same session, and asks you to recalibrate afterwards because both jobs change the toolhead's resonance behavior. One user's habit of running the toolhead through its full travel several times before tightening fits that too: the wiki says moving the Y axis back and forth is what evens the tension out.
The anti-vibration feet stay a forum opinion, with one user writing that they do not really reduce artifacts and mostly just quiet the printer down. Nobody in the thread touched the 250 mm/s or the 10,000 mm/s², and where speed is really capped is a different subject, covered in the flow rate article.
What closed and what did not
None of the three threads ends in a clean fix. The hotend and fresh paste made a large difference to the rough surface case, and the layer lines and jagged edges survived it. The accepted answer in the Z banding thread ended one person's problem and nobody else's, and the user who opened a support ticket never posted what came of it. The belt procedure checked out against the wiki, but the thread closed itself two days later without the person who asked reporting back.
There is still an order worth following. Identify the mark against the table first. For roughness, watch the fan turn with your own eyes, then see whether a short print comes out fine and the next one does not; that was the sequence that led to the heat path rather than to a setting. For banding, try the free thing first and change Z hop type to Normal on its own. For ringing, run the wiki belt procedure with the printer off, resist overtightening, and recalibrate at the end. Change five things at once and you will know less about your printer than the people in those threads did.